RenderDoc으로 보는 Rendering Pipeline - VS(Vertex Shader)
출처 및 참고 자료
https://unrealartoptimization.github.io/book/profiling/passes/
어서와 GPU 최적화는 처음이지 - 비엘북스
유니티로 배우는 게임 수학 - 한빛미디어
DirectX 12를 이용한 3D 게임 프로그래밍 입문 - 한빛미디어
https://velog.io/@syiee
https://www.rastertek.com/dx11win10tut04.html
Vertex Shader (정점 셰이더)
개요
VS 단계에서는 IA 단계에서 받은 Input Layout을 토대로 각종 변환을 거쳐 Pixel Shader로 보낼 최종 Output을 만든다. API Inspector로 보면 VS관련 함수들이 호출된 것을 볼 수 있다. 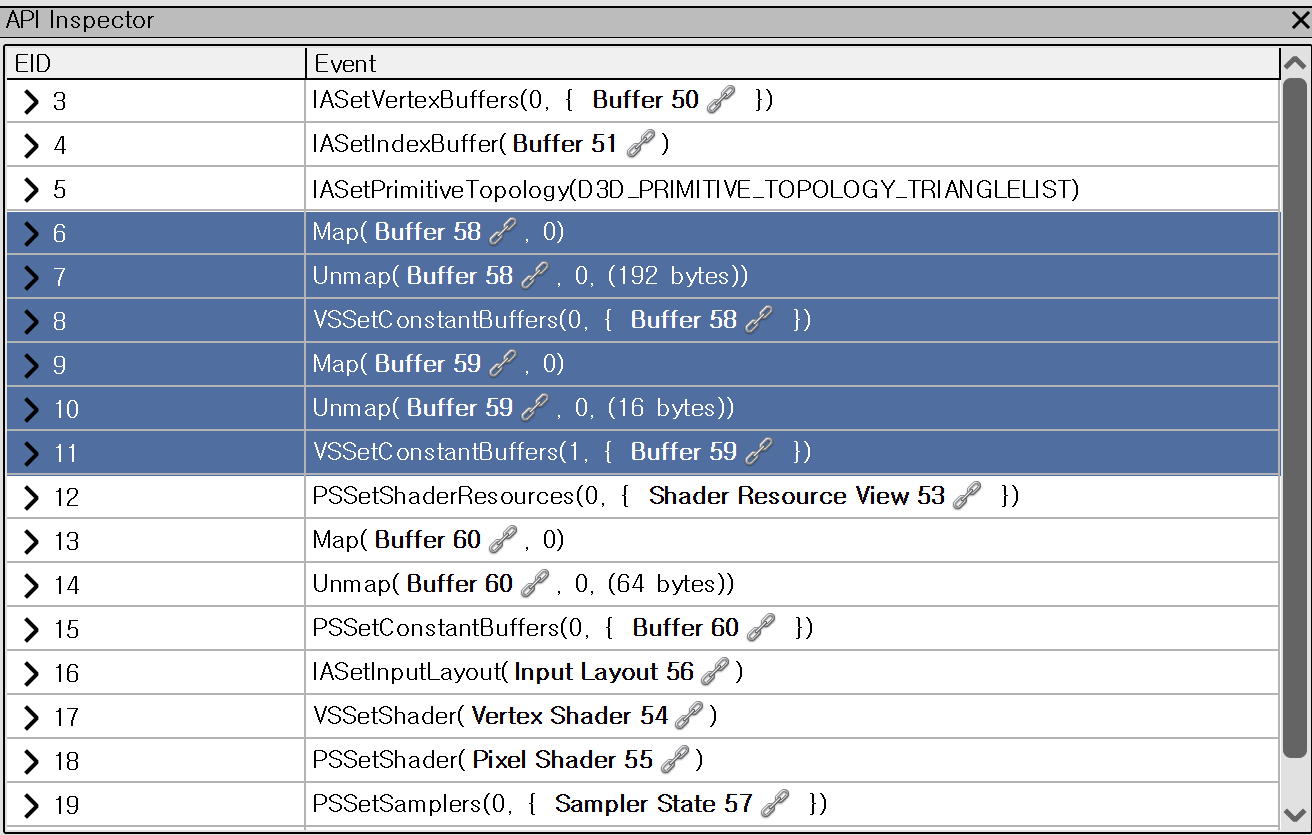
Map과 Unmap 그리고 VSSetConstantBuffer로 구성되어 있는 것을 볼 수 있다. Map과 Unmap은 이 예제에서 Constant Buffer들을 변경하는데 사용한다. 해당 블로그 포스트에 Map과 Unmap에 대해 더 상세히 나와있다.
Constant Buffer (상수 버퍼, cBuffer)
Constant Buffer란 GPU에서 셰이더가 사용할 데이터를 효율적으로 전달하기 위한 버퍼로, 다양한 자료를 저장할 수 있다. Vertex Shader 역시 정점의 변환을 위해 카메라의 위치, FOV 등 여러 자료를 필요로 한다. 테스트 프로그램에서는 2개의 Constant Buffer가 사용되어서 2개의 버퍼가 보인다.
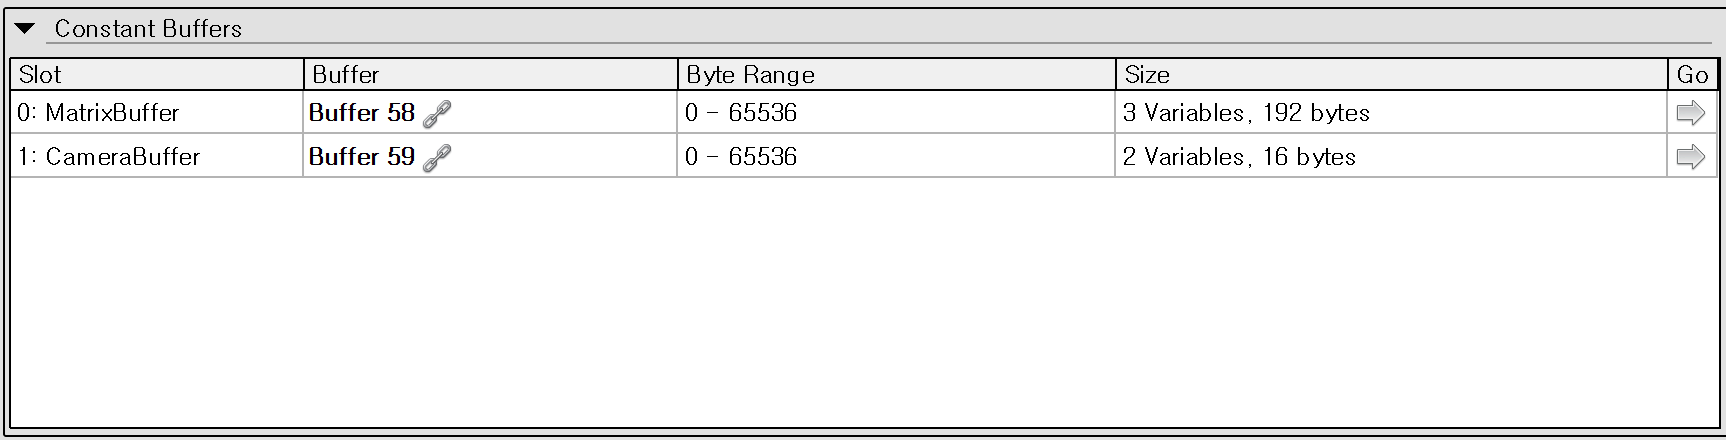
MatrixBuffer는 흔히 VS 단계에서 말하는 좌표 변환 즉, Model, View, Projection 변환을 하기위한 버퍼이다. 아래는 DirectX를 초기화하면서 함께 Projection과 World Matrix를 초기화하는 코드다.
1
2
3
4
5
6
7
8
9
10
11
12
13
14
bool D3DClass::Initialize(int screenWidth, int screenHeight, bool vsync, HWND hwnd, bool fullscreen, float screenDepth, float screenNear)
{
	//.
	//.
	//Projection Matrix는 XMMatrixPerspectiveFovLH 함수로 만든다. FOV와 Aspect, Near와 Far를 지정해서 호출하면 된다.
	fieldOfView = 3.141592654f / 4.0f;
	screenAspect = (float)screenWidth / (float)screenHeight;
	m_projectionMatrix = XMMatrixPerspectiveFovLH(fieldOfView, screenAspect, screenNear, screenDepth);

	//Model 변환을 위한 World Matrix는 단위행렬로 간단하게 채운다.
	m_worldMatrix = XMMatrixIdentity();
	//.
	//.
}
View Matrix는 CameraClass를 정의하고 Render할 때 카메라의 위치 등에 따라 업데이트되도록 되어 있다.
1
2
3
4
5
6
7
8
9
10
11
12
13
14
15
16
17
18
19
20
21
22
23
24
25
26
27
28
29
30
31
32
33
34
35
36
37
38
39
40
41
42
43
44
45
46
47
48
49
50
51
52

/// Render 함수는 camera의 positons와 rotations를 사용하여 view matrix를 업데이트하고 빌드한다.
/// 최초로 위치와 회전, 윗방향, 앞방향 등을 만들고 camera의 각종 값들을 이요하여 camera를 회전시킨다. 회전한 다음엔 카메라를
/// 3D 공간에서 이동시킨다. 그 다음에는 XMMatrixLookAtLH함수를 이용해 현재 카메라의 위치와 평행이동을 나타내는 view matrix를 만든다.
void CameraClass::Render()
{
	XMFLOAT3 up, position, lookAt;
	XMVECTOR upVector, positionVector, lookAtVector;
	float yaw, pitch, roll;
	XMMATRIX rotationMatrix;

	//윗 방향 정의
	up.x = 0.0f;
	up.y = 1.0f;
	up.z = 0.0f;

	upVector = XMLoadFloat3(&up);

	//카메라의 위치
	position.x = m_positionX;
	position.y = m_positionY;
	position.z = m_positionZ;

	positionVector = XMLoadFloat3(&position);

	// 카메라의 앞 방향 정의
	lookAt.x = 0.0f;
	lookAt.y = 0.0f;
	lookAt.z = 1.0f;

	lookAtVector = XMLoadFloat3(&lookAt);

	// 라디안으로 Yaw, Roll, Pitch 설정
	pitch = m_rotationX * 0.0174532925f;
	yaw = m_rotationY * 0.0174532925f;
	roll = m_rotationZ * 0.0174532925f;

	rotationMatrix = XMMatrixRotationRollPitchYaw(pitch, yaw, roll);

	//rotation matrix로 lookAtVector와 upVector를 회전시켜 view가 원하는 방향을 보도록 설정
	lookAtVector = XMVector3TransformCoord(lookAtVector, rotationMatrix);
	upVector = XMVector3TransformCoord(upVector, rotationMatrix);

	// Translate the rotated camera position to the location of the viewer.
	// viewer의 위치로 회전된 카메라 이동
	lookAtVector = XMVectorAdd(positionVector, lookAtVector);

	// 3개의 업데이트된 벡터로 view matrix 생성
	m_viewMatrix = XMMatrixLookAtLH(positionVector, lookAtVector, upVector);

	return;
}
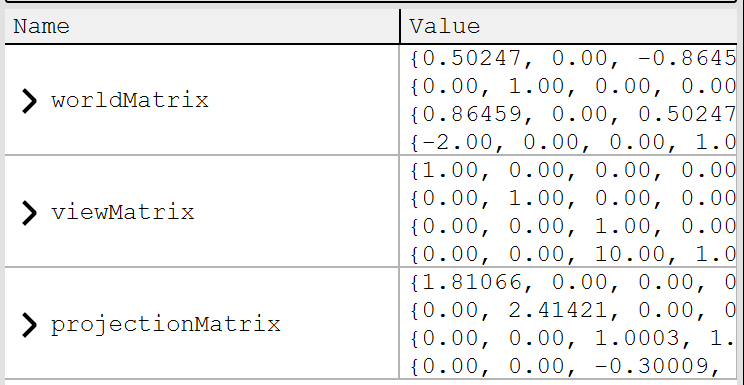
이렇게 모인 World, View, Projection Matrix들을 하나의 MatrixBuffer로 만들어 업데이트하면 셰이더로 데이터를 보낼 준비가 된다. 여기서 Map과 Unmap이 사용된다.
D3D11_MAPPED_SUBRESOURCE를 선언하고 Map을 통해 Unlock, MatrixBufferType으로서 수정하고 다시 Unmap하여 Lock하는 것을 볼 수 있다.
1
2
3
4
5
6
7
8
9
10
11
12
13
14
15
16
17
18
19
20
21
22
23
24
25
26
27
28
29
30
31
32
33
34
35
36
37
38
39
40
41
42
43
44
45
46
47
48
49

struct MatrixBufferType
{
	XMMATRIX world;
	XMMATRIX view;
	XMMATRIX projection;
};

bool ShaderClass::SetTextureShaderParameters(ID3D11DeviceContext* deviceContext,
	XMMATRIX worldMatrix, XMMATRIX viewMatrix, XMMATRIX projectionMatrix, ID3D11ShaderResourceView* texture)
{
	HRESULT result;
	D3D11_MAPPED_SUBRESOURCE mappedResource;
	MatrixBufferType* dataPtr;
	unsigned int bufferNumber;


	// 전치 행렬 연산
	worldMatrix = XMMatrixTranspose(worldMatrix);
	viewMatrix = XMMatrixTranspose(viewMatrix);
	projectionMatrix = XMMatrixTranspose(projectionMatrix);

	//Constant Buffer를 Lock하여 쓰기가 가능해지도록 함
	result = deviceContext->Map(m_matrixBuffer, 0, D3D11_MAP_WRITE_DISCARD, 0, &mappedResource);
	if (FAILED(result))
	{
		return false;
	}

	dataPtr = (MatrixBufferType*)mappedResource.pData;

	// 업데이트된 Matrix들을 dataPtr에 넣어줌
	dataPtr->world = worldMatrix;
	dataPtr->view = viewMatrix;
	dataPtr->projection = projectionMatrix;

	// Constant Buffer Unlock하기
	deviceContext->Unmap(m_matrixBuffer, 0);

	bufferNumber = 0;

	// 업데이트된 값들을 Vertex Shader로 보낸다
	deviceContext->VSSetConstantBuffers(bufferNumber, 1, &m_matrixBuffer);

	//.
	//.
	//.
}
이러한 과정을 거치고 나면 Constant Buffer 중 Matrix Buffer가 채워지고 Vertex Shader에서 사용될 수 있게 된다. 위 스크린샷의 Camera Buffer 또한 광원 효과를 위해 만들어져서 Vertex Shader로 보내졌다.
당연히 Vertex Shader에 보내는 Constant Buffer는 Vertex Shader에서 정의된 자료형과 같아야 한다.
1
2
3
4
5
6
7
8
9
10
11
12
13
14
cbuffer MatrixBuffer
{
    matrix worldMatrix;
    matrix viewMatrix;
    matrix projectionMatrix;
};

cbuffer CameraBuffer
{
    float3 cameraPosition;
    float padding;
};
//.
//.
MVP 변환
업데이트된 MatrixBuffer들을 정점에 곱해주면 좌표 변환이 완료된다.
1
2
3
4
5
6
7
8
9
10
11
12
13
14
15
16
17
18
19
20
21
22
23
24
25
26
27
28
29
30
31
32
33
34
35

struct VertexInputType
{
    float4 position : POSITION;
    float2 tex : TEXCOORD0;
    float3 normal : NORMAL;
};

struct PixelInputType
{
    float4 position : SV_POSITION;
    float2 tex : TEXCOORD0;
    float3 normal : NORMAL;
    float3 viewDirection : TEXCOORD1;
};

PixelInputType LightVertexShader(VertexInputType input)
{
    PixelInputType output;
    float4 worldPosition;

    input.position.w = 1.0f;

	//여기서 Pixel Shader로 보내는 VertexOutput 즉, PixelInput에서는 world, view, projection Matrix가 최초 vertex input에 곱한다.
    output.position = mul(input.position, worldMatrix);
    output.position = mul(output.position, viewMatrix);
    output.position = mul(output.position, projectionMatrix);

	//기타 광원 방향 및 노말 처리
    //.
	//.
	//.

    return output;
}
이렇게 변환을 완료하면 vertex들이 좌표 변환을 완료하고 우측 결과를 가지게 된다. 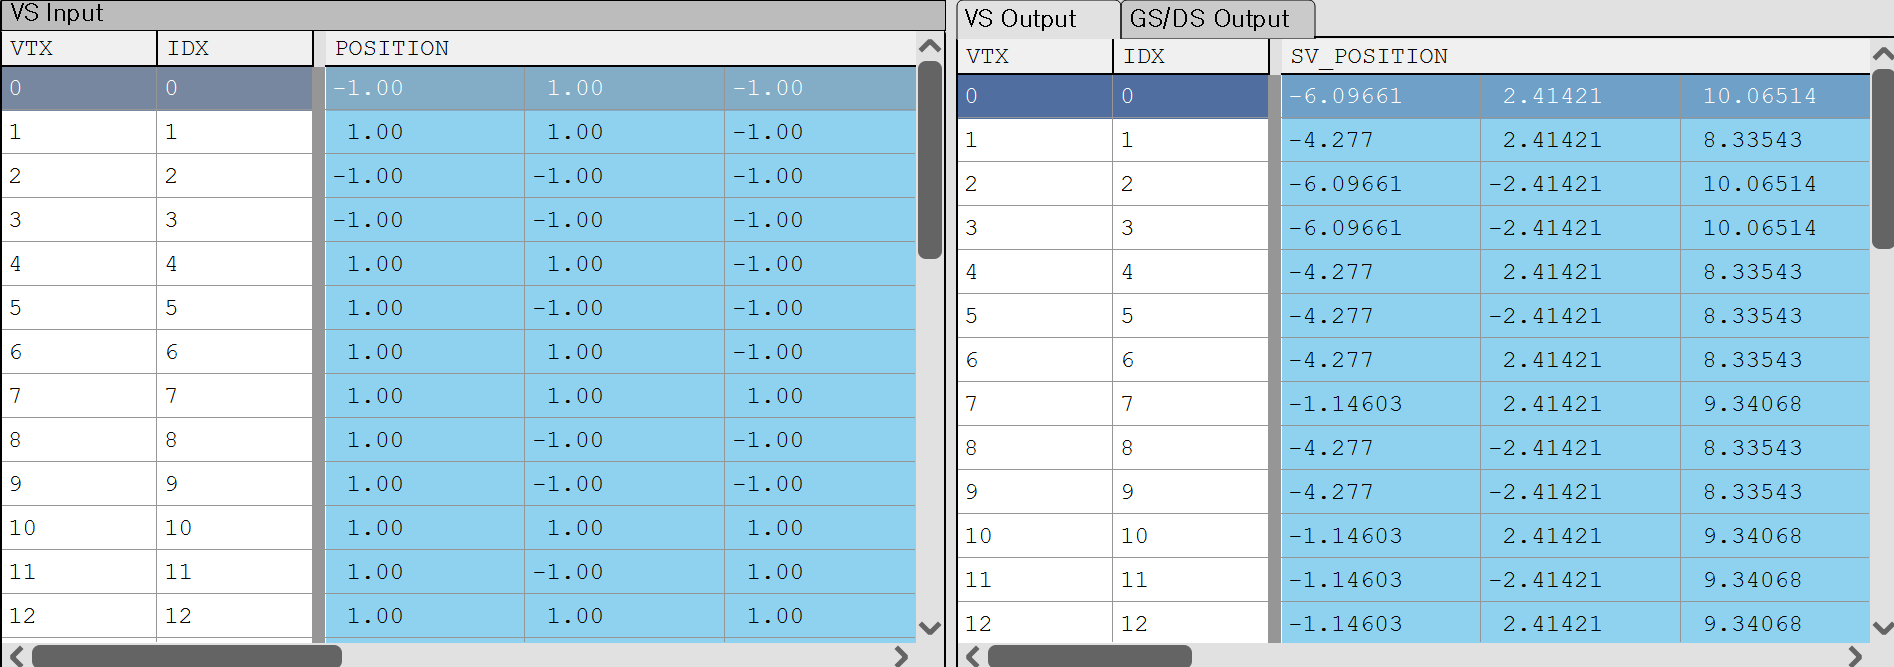
RenderDoc으로 Preview를 확인하면 Local Space에 존재하던 정점들이 World, View를 거쳐 Projection까지 된 결과를 볼 수 있다.
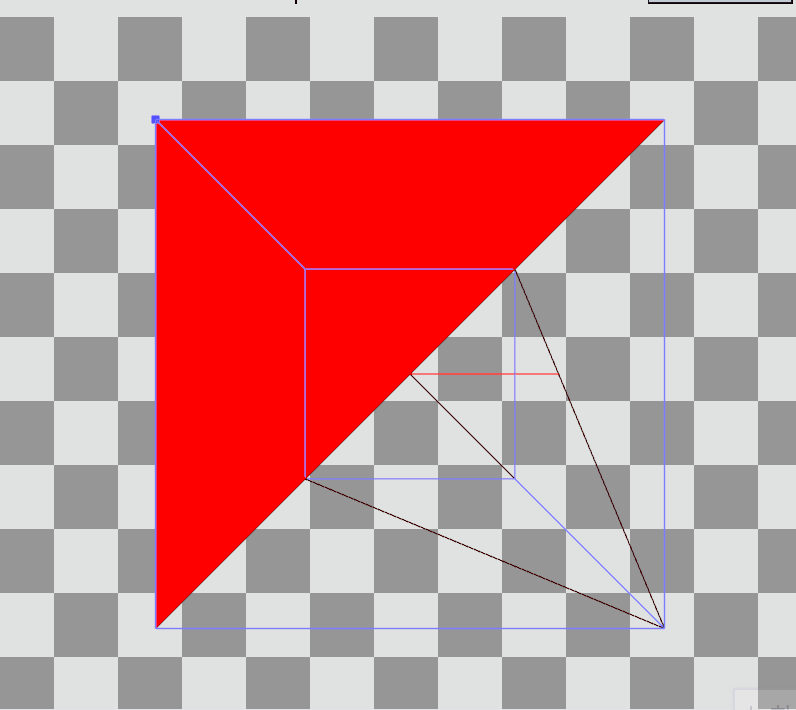 Local Space의 큐브에서
 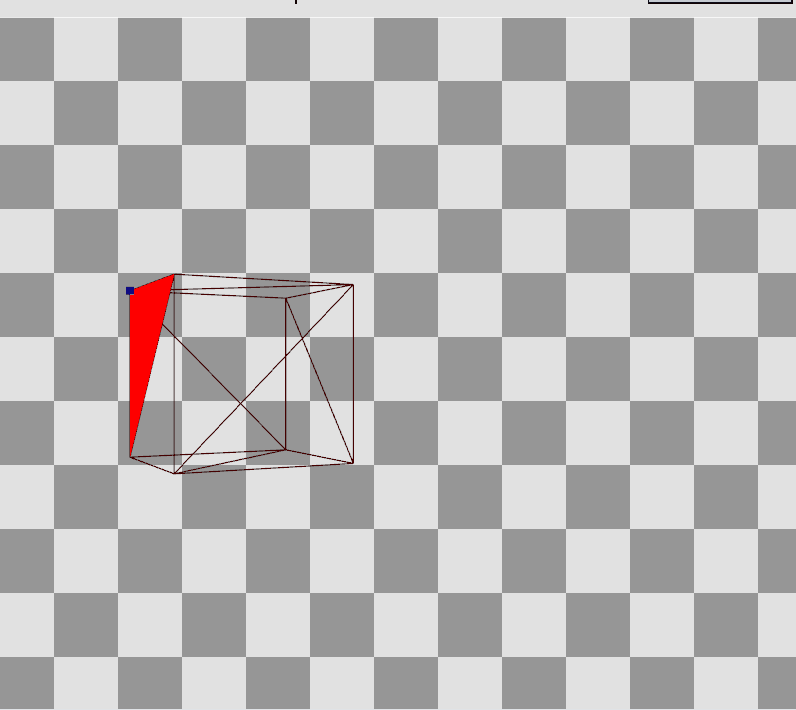 Projection 변환 후
마무리
이렇게 변환이 완료된 PixelInputType(정의하기 나름인) output은 Rasterizer를 거쳐 PS에서 Input으로 사용된다.